
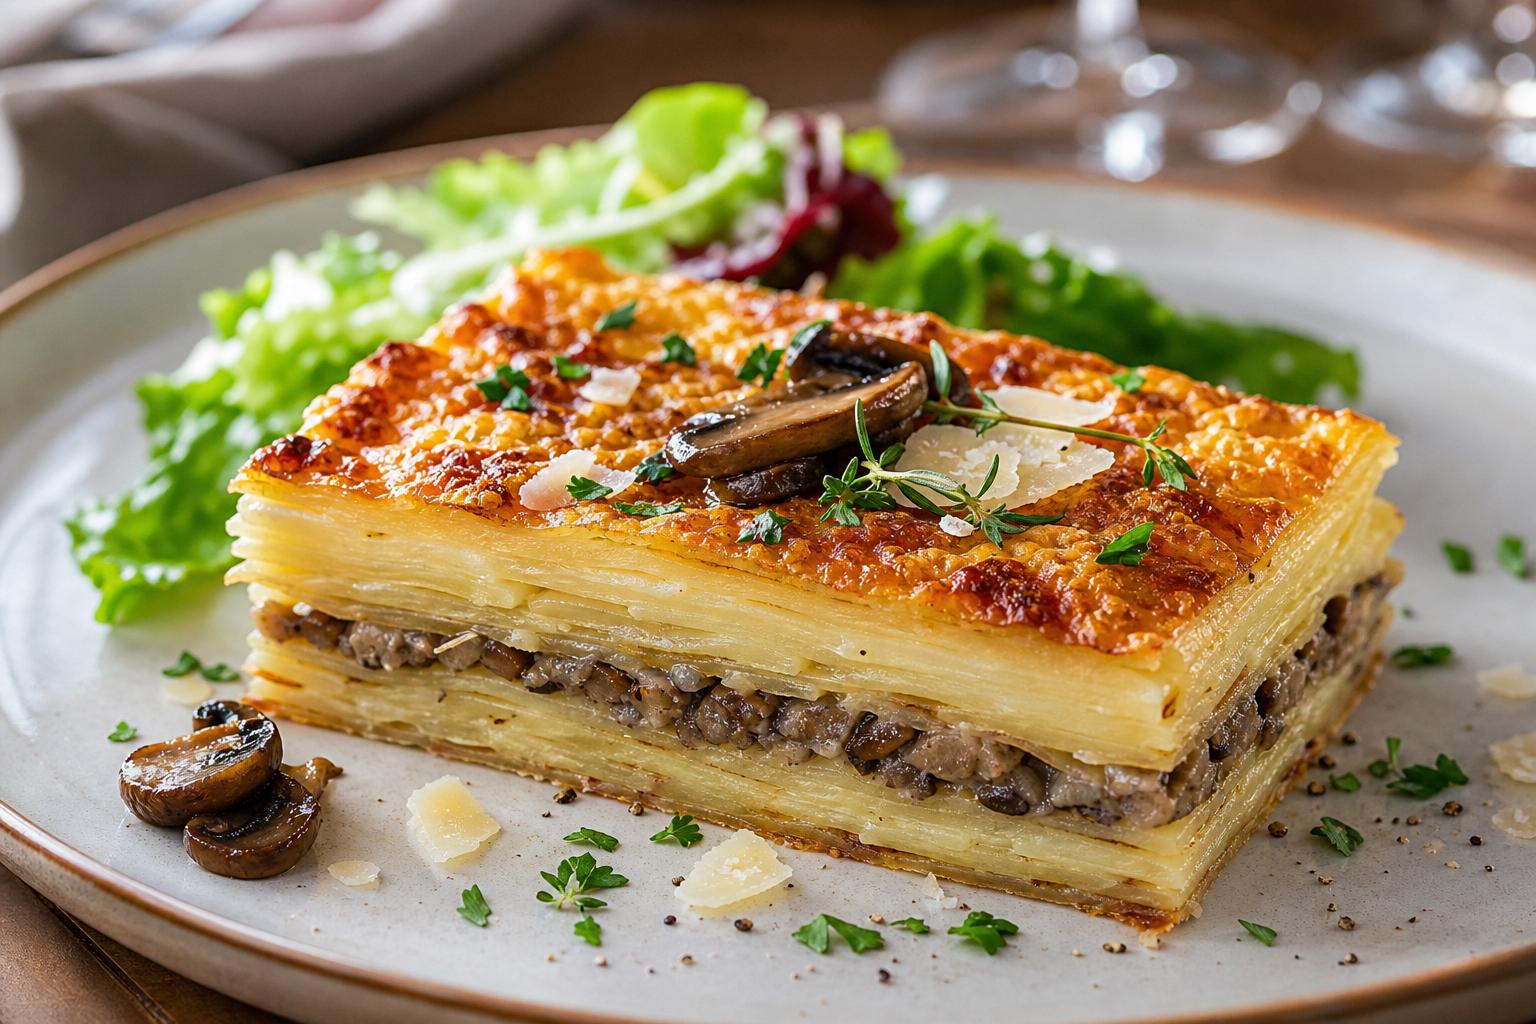
With a few careful steps, potato gratin becomes elegant and easy to serve
A family-style gratin can sometimes present a challenge: while it is undeniably tasty, it often lacks clean cuts. The combination of cream, cheese, and moisture from the vegetables can cause it to fall apart on the plate. However, by applying a technique inspired by savory millefeuille, you can transform it. The potatoes are layered in thin slices, compacted in a mold, and pressed after baking, resulting in a dish that resembles the carefully prepared plates often seen at catered events, yet remains easy to make at home.
The right choice of potatoes makes all the difference
The journey begins in the vegetable aisle. To achieve a compact, melting, and easily sliceable gratin, it is best to choose starchy potatoes. Varieties such as Bintje, Agria, or Monalisa are well-suited for long cooking times. Their flesh softens without completely disintegrating between layers.
The starch plays a subtle but crucial role. When combined with cream and heat, it naturally thickens the mixture. As a result, the slices stick together, forming a more stable structure. This is also why the slices should not be rinsed after cutting.
Avoid washing the potatoes once sliced to preserve the starch that binds the layers during cooking.
A mandoline is great for achieving consistent slices about two millimeters thick. Care should be taken when using this tool as the blade is quite sharp. Using a finger guard or a suitable glove can help prevent accidents when the potato shrinks in size.
Well-cooked mushrooms to prevent a watery gratin
Mushrooms add a lovely earthy flavor and enhance the generous nature of the dish. However, they can ruin the texture if added raw, as their moisture will leak out during baking and result in soggy potato layers.
The solution is to prepare a duxelles. This culinary term refers to a finely chopped mushroom filling that is cooked long enough to concentrate its flavor. Button mushrooms work perfectly, but you could also include some shiitakes or rehydrated porcini for a stronger aroma.
The steps for making duxelles
- Clean the mushrooms with a damp cloth, avoiding soaking them in water.
- Finely slice them along with two shallots.
- Sauté the shallots in a bit of butter.
- Add the mushrooms over a relatively high heat.
- Wait for all their juices to evaporate before adding salt.
- Add garlic and parsley towards the end of cooking, then chop everything together.
Salt is added later because it encourages water to escape. The filling should remain moist without swimming in liquid. Though this step requires a bit of patience, it is vital for the dish’s success.
Stacking tightly creates a caterer-style effect
A loaf pan is particularly convenient for this millefeuille. Its elongated shape makes it easier to remove and produces uniform portions. Generously line the pan with parchment paper, allowing the edges to hang over the sides; these flaps will act as handles when the dish cools.
Start with a layer of potatoes, slightly overlapping them. A bit of melted butter, a spoonful of cream, thyme, a pinch of nutmeg, and pepper will suffice. Next, add a thin layer of duxelles and a sprinkle of grated cheese.
Comté cheese adds a mild sweetness and a lovely color. Using Parmesan will impart a more pronounced and salty flavor. You do not need a lot of cheese between each layer; too much can overpower the delicate potato flavor.
The visual secret lies in uniformity: thin slices, light toppings, and pressing each layer before adding the next.
Repeat the layering process until you reach the top of the pan. Gently pressing down with the back of a spatula at each layer helps expel air pockets and creates a more uniform structure. The final layer can be topped with more potatoes, a drizzle of cream, and a bit of cheese to form a golden crust.
Gentle cooking before the final browning
The dish is first cooked covered at around 180 degrees. A sheet of aluminum foil limits quick evaporation of the cream, allowing the potatoes ample time to become tender. Depending on the thickness of the pan and the potato slices, expect about an hour of cooking time.
The tip of a knife should slide through the center with little resistance. At this point, remove the foil and continue cooking for a few more minutes until the surface turns amber and the edges begin to crisp slightly.
| Step | Temperature | Cooking Time |
|---|---|---|
| Covered cooking | 180 °C | 55 to 65 minutes |
| Top browning | 180 °C | 10 to 15 minutes |
| Resting under pressure | Out of the oven | 15 to 30 minutes |
Resting under pressure, the key to precise slicing
The oven does not do everything. As soon as it comes out of the mold, a small clean board or another dish should be placed on the millefeuille, then add a moderate weight. A can or small pot will do nicely. The goal is not to crush the gratin but to bond the layers while they are still warm.
After about fifteen minutes, the millefeuille starts to hold together. For perfectly neat slices, especially for a meal with multiple guests, it is best to prepare it the day before. Once cooled under pressure, it can go into the refrigerator in its mold.
Preparing portions in advance
The next day, the chilled block can be easily cut with a long knife. The portions can be placed on a baking tray, then reheated in the oven at moderate temperatures. A non-stick pan with a bit of butter will also allow you to gently brown one side before serving.
This preparation frees up time especially when serving a roast, poultry, or fish. The gratin pairs wonderfully with chicken fillets, veal roasts, or beef pieces. A green salad dressed with a zesty vinaigrette brings a refreshing contrast to the richness of the cream and cheese.
Some variations without sacrificing texture
For a more rustic version, some well-cooked lardons can be added to the duxelles. Make sure to drain them before assembling to avoid excess grease. Chopped hazelnuts sprinkled on top at the last moment can also add a delightful crunch.
Vegetable lovers might want to add a thin layer of sautéed and well-drained spinach. The same principle applies: any wet filling should be cooked or drained before entering the mold. It is this control over moisture that allows the gratin to maintain its shape while keeping its tender core.